AWS Dashbaord With Python, Boto and Flask
So I actually started working on a small little dashboard for AWS for another project I am working on in the office; however I decided to fork it and make this into a dashboard which could be used by many other people to get a single view of their AWS environment. Besides that I also wanted to create a small way to detect unattached ebs volumes, unattached elastic IPs, and upcoming events for your EC2 instances. Hopefully as time permits I can grow this small project into a very powerful tool for other people to use.
Web Interface
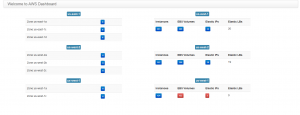
I don’t know about you but when ever I go check out any type of dashboard I like to go look at the screenshots to give me a quick idea about the project, so I figured I would start there before going into the details.


Features
Right now the feature list is pretty limited, but they all work and they all work well:
- List Of Available Availability Zones In Each Region
- Availability Zone Status Per Region
- Instance Count Per Region
- Instance Count Turns “Red” If Events Are Scheduled
- List Of Events By Instance ID
- EBS Volume Count Per Region
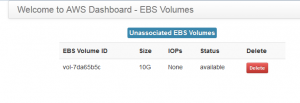
- EBS Volume Count Turns “Red” If Any EBS Volumes Are Unattached
- Ability To Delete Unattached EBS Volumes
- Elastic IP Count Per Region
- Elastic IP Count Turns Red If Any Elastic IPs Are Unattached
- Ability To Delete Unattached Elastic IPs
- Elastic Load Balancer Count Per Region
Install – Python Requirements
You will need to install the following python modules, I prefer to use pip to install my python modules:
- sudo pip install flask
- sudo pip install boto
Configuration
Obviously the first thing you are going to want to do is to clone the repository:
git clone git@github.com:bcarpio/aws_dashboard.git
Next, you will want to copy the config_example.py to config.py:
cp config_example.py config.py
Then you will need to edit the config.py file and change the following values:
- AWS_ACCESS_KEY_ID
- AWS_SECRET_ACCESS_KEY
- region_list
Starting The Flask Web Interface
Now you should be ready to start the flask web interface, by simply typing the following command:
python service.py
This will start a web interface which will be listening on port 5000. If you look at the last line of the service.py file you will notice the following line:
app.run(host='0.0.0.0')
This determines which IP you want the app to listen on, for testing you might as well have it listen on any IP.
Configure For Apache
That really is out of the scope of this document, if you wish to configure flask to use Apache you should refer to the flask documentation here:
http://flask.pocoo.org/docs/deploying/mod_wsgi/
Link To Github Project
Finally here is the link to the project:
https://github.com/bcarpio/aws_dashboard
Hi.
I see you removed your bcarpio/aws_dashboard.git?
Can you pls. fix your link if any chance?
I checked it still seems to be there..